You’ve just launched your WooCommerce store and you’re now looking to optimize sales. Your store is running but sales aren’t that appealing. Or maybe you’re doing well, but you desire even higher revenues.
Have no fear, the WooCommerce Facebook Pixel integration has got you covered.
Meta (formerly Facebook) Pixel is the tech magic pushing sales for many other businesses like yours. It places the power in your hands to refine your retargeting campaigns, create custom audiences, understand your audience’s behavior, and display your ads to the right people.
You can even target them with the products they abandoned in their carts, courtesy of the Meta Pixel.
Sit tight because you are about to find out everything about Facebook pixel WooCommerce integration and its benefits for your store.
What is Meta (formerly Facebook) pixel?
The Meta (formerly Facebook) pixel is a tracking code generated from your Facebook ad account and implemented on the header section of your WooCommerce store’s website.
It captures specific actions visitors perform on your site and provides you with data to help you refine your Facebook and Instagram advertising campaigns to maximize performance.
You can use the data your Meta pixel records to show your ads to different audience segments based on their actions on your online store. After creating custom audiences based on your Pixel data, you can also use them to create lookalike audiences to acquire new customers.
The Meta pixel is created and managed using the Facebook Business Manager.
I don't want to go too deep into technicalities, but if you're interested, we have an excellent article explaining in further detail how does Meta pixel work.
Why should I install the WooCommerce Facebook Pixel integration?
The Facebook Pixel has great importance in three areas: Audience creation, measurement, and optimization.
Let's break it down into the 5 main benefits of adding the Pixel to your WooCommerce store.
1. Create custom audiences for better ad targeting
Wouldn’t it be great to be able to show your ads to people who already showed interest in your brand?
Well, with Pixel-based custom audiences you can do exactly that.
Retargeting people who visited your store and encouraging them to purchase more products will definitely improve your conversion rate and increase your sales significantly.
Moreover, unless you sell a single product, audiences have different product interests. And even if you sell a single product, audience behavior in your store may be diverse.
Creating custom audiences based on the Meta pixel data will also allow you to tailor your ads to different audience segments based on the products they’re interested in.
Example: If you are running an apparel store and you want to promote a new line of men's shirts, you can create a custom audience of people who showed interest in men's shirts or general men's apparel in your store. You can use your Pixel data to create a custom audience of people who added various men's apparel to their cart, for example, and display them ads promoting your new men's shirts to increase your sales.
2. Retargeting using dynamic product ads
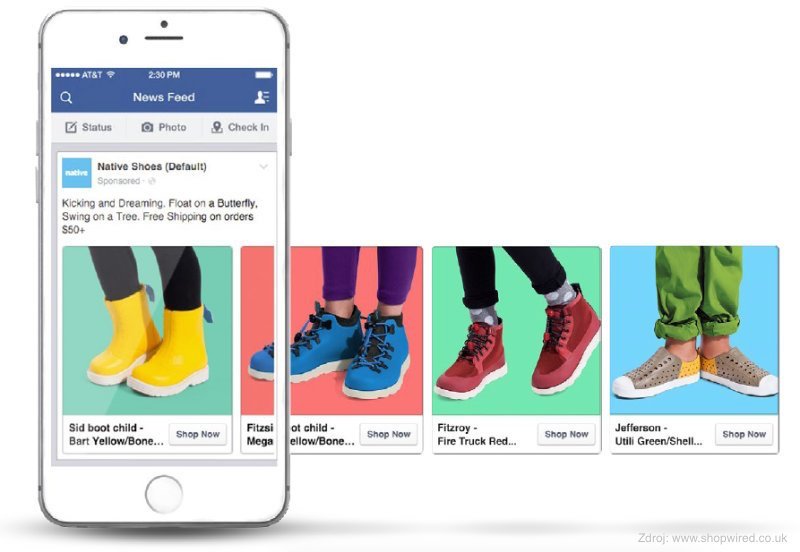
Not every store visit may earn you a purchase. Nevertheless, you can capture the activities of your store visitors and use this data to retarget them with dynamic product ads.
Meta pixel can help you do that. It will capture details of visitors who have clicked products and even added them to their cart but did not complete the purchase.
If you set up your catalog, you can use this data provided by your Meta pixel to run dynamic product ads showing these people exactly the same products they left in their abandoned carts to encourage them to come back and complete the purchase.
3. Lookalike audience creation
Creating lookalike audiences using Meta pixel data is one of the most powerful solutions for acquiring new customers.
Lookalike audiences are groups of Facebook users with similar characteristics to the people in your source audience - in this case, people who visited your store and took action in it.
Facebook has rich data about its user characteristics. Therefore, it can provide you with great help finding exactly the people who have a higher chance to drive conversions for you.
Example: If you create a custom audience of the people who made purchases in your WooCommerce store, you can create a lookalike audience of people with similar characteristics. These people are likely to make purchases in your store as well and that’s a great way to expand your customer base.
4. Optimize your ad campaigns for conversions
When running ads, one of your objectives is to display them to an audience likely to earn conversions for you.
The data you collect using the Meta pixel can help you deliver ads to audiences, which are likely to engage with your products and convert. It will display your ads to people with a higher probability of taking desired actions like making a purchase or signing up for a newsletter.
Example: If you are advertising to increase the number of sales on your WooCommerce store, you can ask Facebook to optimize your campaign for purchase.
Based on your Meta pixel data and Meta's database, your ads will be shown to people who are prone to make purchases and are interested in brands like yours. Facebook targets these people based on user activity and will display your ads to an audience with high chances of conversion.
5. Understand what actually works
If you don’t analyze your advertising performance and act upon your insights, you’re basically shooting in the dark.
The Meta pixel provides you with essential data regarding your ad performance and you better take advantage of that to improve your future campaigns.
Tracking ad attribution to conversions on your WooCommerce store will let you know exactly which ads work and which don’t, so you can distribute your advertising budget wisely and improve your results. This data will also help you plan your future campaigns.
You can also analyze your performance among different audience segments according to demographics, placements, and devices. This will help you enhance your audience targeting.
Example: If you run a campaign that includes 5 different ad sets, but only one of them drives purchases on your WooCommerce store, you can pause all the others and scale the top-performer. You can also go down to the ad-level and focus only on your successful ads.
This was a brief summary of the great advantages of the Meta pixel. Of course, you can read another article to learn how to use Meta pixel in ads.
If you're planning a Black Friday/Cyber Monday campaign (or any other big sale), you should check out our guide.
How to install the WooCommerce Facebook Pixel integration
If you didn’t create a Meta pixel yet, you should read our article about creating a Meta pixel.
Do you have a Meta pixel already? Great!
Let’s install it on your store and get you a perfect WooCommerce and Facebook integration then.
You can add the Meta pixel to your WooCommerce store through Facebook’s Events Manager or via WooCommerce’s UI.

Install the Facebook Pixel via WooCommerce’s UI
Here is a step-by-step guide to get you started with WooCommerce Facebook Pixel integration and sync your WooCommerce catalog to Facebook.
Download and install Facebook for WooCommerce plugin (it is FREE)
- Click here to download the Facebook for WooCommerce plugin by clicking on “FREE DOWNLOAD”.
- It will redirect you to a WordPress login page. Login with your details.
- You have the plugin on the cart. Click “CONTINUE” and then click on “PURCHASE”.
- On the “Thank you for your order!” page, you can either click on “ADD TO SITE” to add the plugin directly to your page or click “DOWNLOAD” to download the plugin and install it on your site.
- If you choose to download the plugin, log into your website dashboard and navigate to Plugins > Add New > Upload Plugin. Drag and drop your downloaded plugin or click “Choose File”, locate and select your plugin on your computer, and install it via “Install Now”.
- Once the plugin installation is done, click on “Activate Plugin” to make it ready for configuration.
Configure the Facebook for WooCommerce plugin
- Navigate to WooCommerce > Facebook to access plugin settings
- Click “Get Started” under the “Connection” tab of the plugin options.
- Grant the plugin access to your Facebook via “Continue as [Account Name]” or “Log in to another account”.
- In the next screen titled “Connect WooCommerce Extension V2 to Facebook”, click “Continue” to grant permissions.
- Under “Confirm settings” select Business Manager, Catalog, Instagram profile, Facebook Page, and Facebook pixel. Once done, click “Continue”.
- Select “What business do you want to use with WooCommerce Extension V2?”
- Next, choose “What is WooCommerce Extension V2 allowed to do?”
- You should see a “Linking WooCommerce Extension V2 to Facebook”. After a short while, you will see a message “You’re all set!”. This means you have successfully connected Facebook for WooCommerce to your Facebook Page to sync products.
- Click “Done”.
- WooCommerce will display a message informing you that “You just authenticated Facebook!”
- Click on “THAT’S MY SITE – REDIRECT ME” and you will be back into your website where you will now see your Page, Pixel, Catalog, Business Manager account, and Ad Manager account.
- Proceed to the “Product sync” tab to add products to your Facebook page.
- On this page, you can Enable product sync, Exclude categories from sync, Exclude tags from sync, and select Product description sync.
- Once you are set, you can click on “Save changes”.
Congratulations! You connected your Woocommerce store to Facebook!
You should start seeing your products when you click Shop options on Facebook.
Add the Pixel via Facebook’s Events Manager using the Woocommerce integration
- Go to the Events Manager.
- Select your Pixel.
- Click “Continue Pixel Setup” and then “Use a Partner”.
- Note: If you already installed your Pixel on another website, you can connect it to your Woocommerce store as well by selecting “Partner Integrations” on the left-side menu when you enter the Events Manager.
- Select “WooCommerce” from the partner integration list.
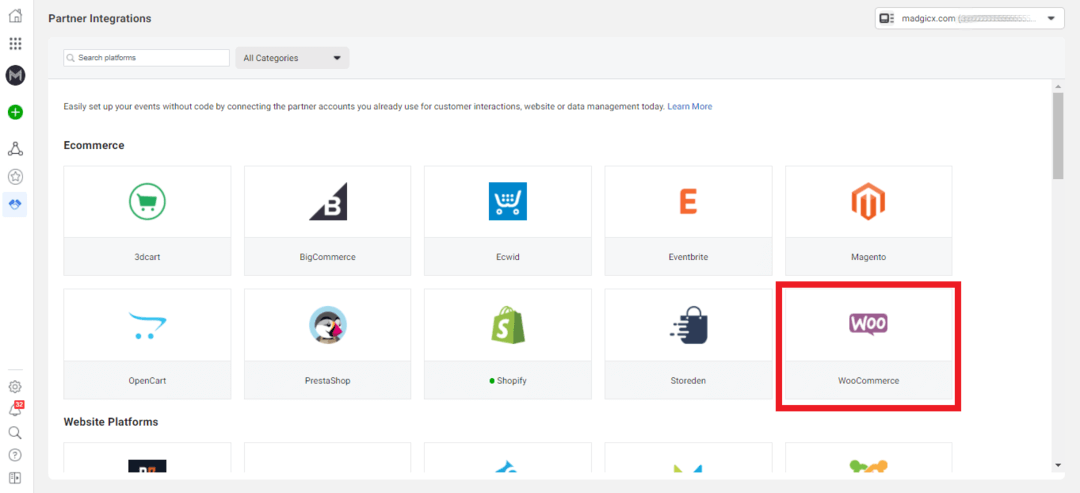
- Follow the on-screen setup instructions.
Install Meta (formerly Facebook) pixel manually on WooCommerce
Alternatively, if you don't want to use the integration, you can manually add the Meta pixel to your WooCommerce store. Here's how to install Meta pixel manually on WooCommerce:
- Go to the Facebook Events Manager.
- Select your Pixel and click “Continue Pixel Setup”.
- Select “Install Code Manually” and copy the Pixel base code.
- Find your website’s header or locate the header template in your CMS or web platform. Paste the base code at the bottom of the header section, just above the closing head tag, and click “Continue”.
- At this stage, you can turn on “Automatic Advanced Matching” and verify the customer information you want to send. This is only optional and I’ll explain more about it later on. Click “Continue”.
- Add Events using the Events Setup Tool or by manually adding the relevant code to your website, and click “Done”.
Facebook Pixel standard events for WooCommerce

- Add to Cart: Track visitor action when they add items to their shopping carts by clicking on a “Buy Now” or an “Add to Cart” button.
- Add Payment Info: Tracks visitor actions such as entering payment information during the checkout flow like shipping and billing data.
- Complete Registration: Tracks visitor action when they sign up for a service or create an account during checkout.
- Initiate Checkout: Tracks visitor activities when they enter into the checkout process.
- Lead: Tracks visitor interest in products or services. For example, when they get to a landing page and sign up for a trial or submit an inquiry form.
- Purchase: Tracks when customers complete a purchase and view the “Thank You” page in the checkout flow.
- Search: Tracks product or content searches on your store.
- View Content: Tracks content pages viewed by visitors like articles, landing pages, and product pages.
Custom conversions
When should you create additional custom Meta pixel conversions beyond the standard events you set up for your WooCommerce store?
Do it when you want to tell Facebook what’s the value of specific conversions for you.
You can also use customization to distinguish between people who viewed different products in your store. Later on, you’ll be able to show them exactly the ads they'll be interested in.
Custom conversions use URL rules based on specific URL or URL keywords, domains, or additional parameters.
Read another one of our articles if you wish to learn how to set up custom conversions on your WooCommerce store.
An example of a useful custom conversion
Let’s say you have a clothing WooCommerce store.
You decided to create a Facebook ads campaign to promote your new leggings. Hence, you want to target an audience of people who will be interested in this kind of product.
In this case, you can create a View Content event and add a URL-based rule that will make the Pixel fire whenever someone views a page at a URL that contains the keyword “leggings”.
Once you achieve a big enough number of conversions, you can create a custom audience of people who completed this event and target them.
Offline events
What if, in addition to your WooCommerce store, you also have a physical store?
How can you track the effect your online advertising has on sales in your “real-world” store?
Have no fear, Facebook offline events are here!
Tracking your offline conversions will allow you to get a full view of your ad performance and also let you create custom and lookalike audiences based on visitors to your physical store.
Efficiently monitoring offline events is essential for implementing a successful omnichannel marketing strategy.
Read another one of our articles if you wish to learn how to set up offline events.
How to check if your Meta pixel is working?

The most simple way to check that your WooCommerce and Facebook integration works and your Pixel was successfully installed on your store is by utilizing the Facebook Pixel Helper Chrome extension.
This extension is now also available for Microsoft Edge and not only for the Chrome browser.
The Pixel Helper will show you whether your Pixel is active and help you troubleshoot different issues.
Use this link to add the Facebook Pixel Helper Chrome extension to your browser and go to your store.
If your Pixel is working, the extension icon will turn blue, and it will show the number of active Pixels on the store’s website. Check also that the Pixel installed on your store has the same ID as the one you see in the Events manager.
Clicking on the extension icon will open a pop-up window, that will tell you whether your Pixel is working properly. If not, an error notification will appear.
In addition, if your Facebook for WooCommerce integration is not working well, you can troubleshoot issues using Facebook’s Diagnostics and Test Events tools. Moreover, Facebook’s Test Events tool will help you test that your Pixel registers events properly.
Communicate with customers via Facebook Messenger
Communicating with your customers via Facebook Messenger has many benefits for your business:
- It makes it easier to share product information with customers whenever they need it.
- You can respond quickly to customer inquiries through direct messaging, which improves customer experience. This can give you an advantage over your competitors.
- You can exchange images and files with your customers. They can send you an exact image of a product they need and you can confirm its availability, which increases their purchase confidence.
Facebook for WooCommerce integration allows you to communicate seamlessly with your customers by continuing conversations on Facebook Messenger even after the user has left your WooCommerce store.
Let’s learn how to connect Messenger to your store.
How to connect Facebook Messenger to your WooCommerce store
- On your WordPress dashboard, navigate to WooCommerce > Facebook and click on Manage Connection.
- In the Facebook Business extension tab that opens, at the bottom of the middle column titled “Connection Settings”, find “Messenger Chat” and click “Add”.
- Click “Add Plugin” on the pop-up window to “Add customer chat plugin”.
- Now you can choose your language and type in a “Greeting Message”. You can also select colors that match your brand and store. After doing all that, click “Next” to proceed with the configuration.
- Add your website domain name under “Add website domain name” and click “Done”.
- Return to your WordPress dashboard > WooCommerce > Facebook > Messenger tab and make sure you’ve ticked the box next to “Enable Messenger”.
- The “Messenger” button should display on your WooCommerce store on the bottom right of your site.
How to set away messages in Messenger
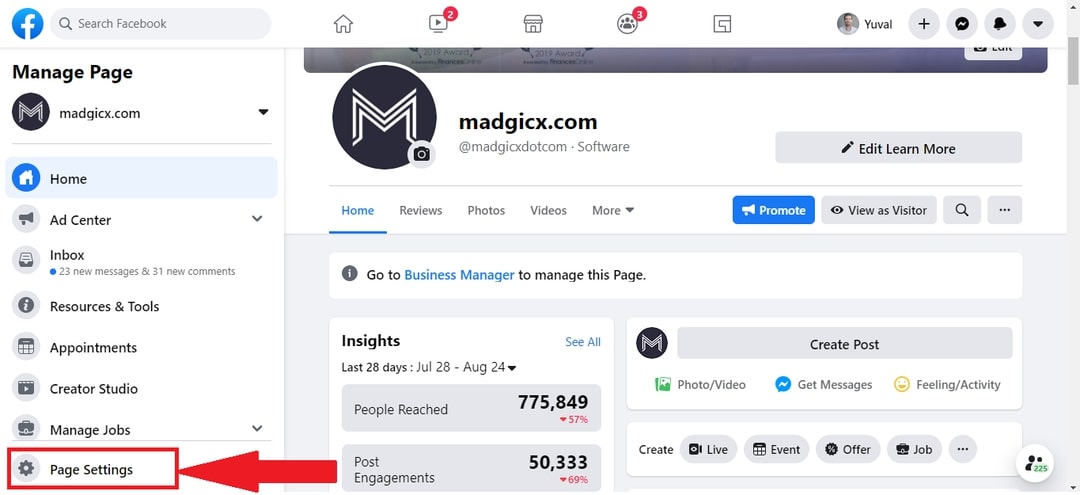
1. Log in to your Facebook account, access your business page, and click “Page Settings” on the left side menu.
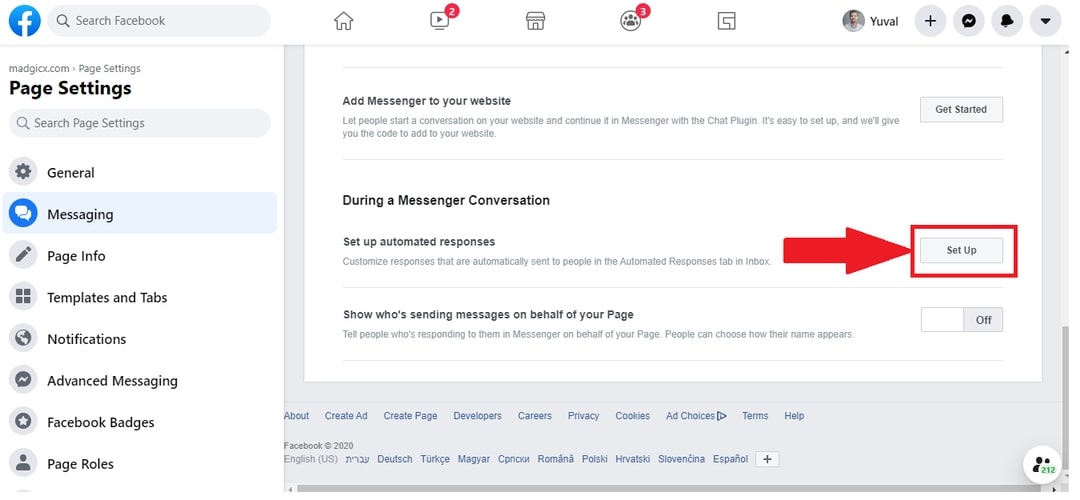
2. Select “Messaging” and scroll down to the section “During a Messenger Conversation”. Then click “Set Up” next to “Set up automated responses”.
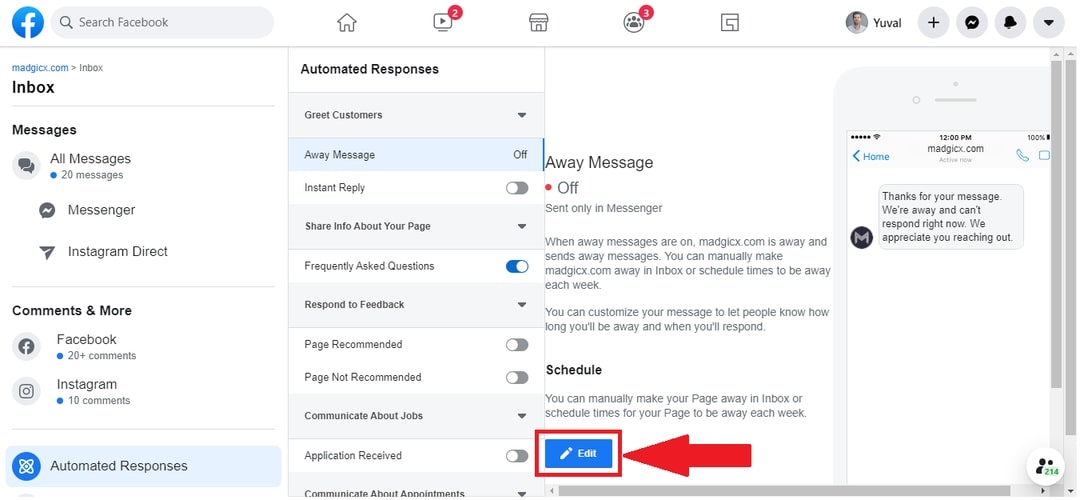
3. Click “Edit” under “Schedule”.
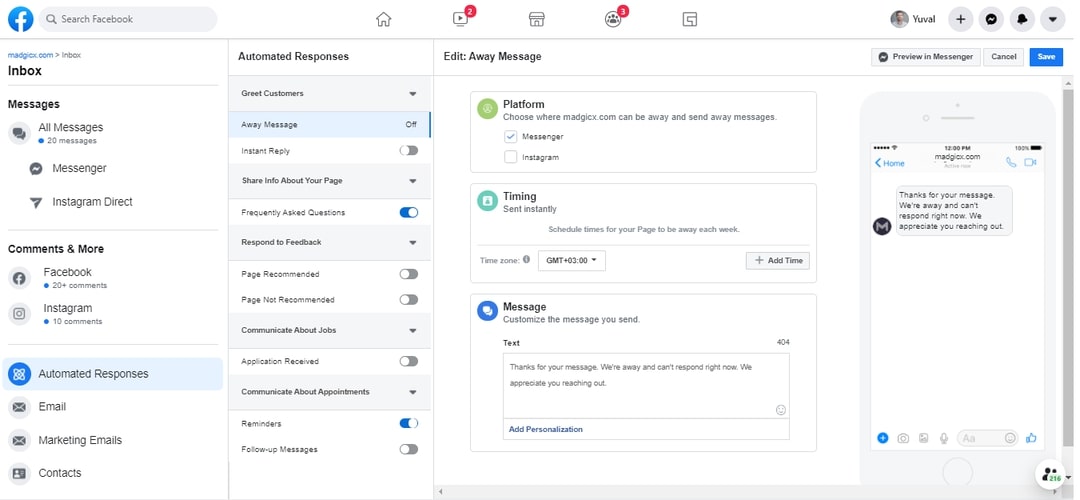
4. Under “Platform”, select “Messenger”.
5. Under “Timing”, set the times for your page to be away each week. Click “Add Time” to add more time slots.
6. Under “Message”, type in your away message. You can also personalize your message to include the recipient’s first, last, or full name, a Facebook page link, a website, a phone number, or an email or a physical address.
7. You can see the message preview on the right side of the screen. Once you’re done editing, click “Save” on the top right corner to launch your away message.
Why are my products not displayed in my Facebook shop after installing the WooCommerce Pixel integration?
If your products fail to display on your Facebook shop after you install the Facebook for WooCommerce plugin, don’t worry! There is a way to solve it and sync WooCommerce with your Facebook shop.
Such issues usually arise when you manually set up your Facebook shop outside the plugin wizard. This might cause your Facebook page to link to a different Facebook catalog than the one the WooCommerce plugin uses.
To check whether your shop was set up manually, log in to your Facebook account and check out your Catalog Manager. You will see a list of product catalogs. If you created the page via Facebook, the name of the product catalog will be in line with the naming convention “Products for <shopname>”. However, if you created it using the WooCommerce plugin, the name structure will be “<shopname> - WooCommerce”. You will also see the respective number of products in the “Number of items” column.
If you see two catalogs, one named according to Facebook’s naming convention and containing 0 products, and the other named according to WooCommerce’s structure and containing the right number of products, it means that the plugin is syncing to a catalog that isn’t connected to your Facebook page.
In order to solve the issue, remove the empty catalog named “Products for <shopname>” and its link with the shop page by clicking “Settings” on the left sidebar and then “Delete”.
Once again, your Facebook Shop will be empty and you will be able to reconnect the plugin to it. The best way to do it will be by running the Facebook For WooCommerce plugin wizard.
Key takeaways
In conclusion, installing the WooCommerce Facebook Pixel integration in your store is crucial for succeeding with Facebook ads. Now you also know it’s not such a complicated process.
Having a Meta Pixel installed on your store will help you improve your targeting, expand your customer base, and gain more conversions.
The installation process can be simplified by using the WooCommerce Facebook Pixel integration.
I’ve also provided you with important information regarding the events you can track with your Pixel and about different ways to identify and troubleshoot Pixel-related issues.
So, I think you’re good to go now. Good luck!
*Contributed to this article: Caleb M.
After the iOS 14.5 update, the Meta Pixel alone can no longer give you the data you need to make effective scaling decisions. Solution? Get accurate performance data with Madgicx Cloud Tracking (MCT).
Yuval is the Head of Content at Madgicx. He is in charge of the Madgicx blog, the company's SEO strategy, and all its textual content.


